For engineers, fabricators, and operations managers, the challenge is constant: how to join stainless steel components without the warping, discoloration, and reduced corrosion resistance that plague conventional methods. The solution is laser welding stainless steel, a transformative technology that delivers unparalleled speed, precision, and quality that traditional TIG and MIG welding cannot match.
Laser welding uses a highly concentrated beam of light to melt and fuse stainless steel with minimal, controlled heat input. This precision-driven process directly solves the core problems of heat distortion and weld volume.
Key Benefits of Laser Welding Stainless Steel:
-
Exceptional Speed: Operates 4 to 10 times faster than TIG welding, dramatically increasing productivity and throughput.
-
Minimal Distortion: The focused heat creates a very small Heat-Affected Zone (HAZ), which drastically reduces or eliminates warping, preserving the part’s dimensional accuracy.
-
Superior Quality: Produces clean, strong, and aesthetically pleasing welds that require little to no post-weld grinding or finishing.
-
Preserved Material Properties: The low heat input maintains the stainless steel’s inherent strength and critical corrosion resistance, preventing issues like “weld decay”.
This guide provides the expert knowledge needed to move from basic understanding to confident application, ensuring you can leverage the full potential of this advanced manufacturing technique.
Laser Welding vs. Traditional Methods: A Head-to-Head Comparison
Choosing the right welding process is critical for project success. Here’s how laser welding stacks up against TIG and MIG for stainless steel applications.
Laser Welding vs. TIG Welding
Tungsten Inert Gas (TIG) welding is known for high-quality, manual welds but struggles to keep pace in a production environment.
-
Speed & Productivity: Laser welding is significantly faster, making it the clear choice for automated and high-volume manufacturing.
-
Heat & Distortion: The TIG arc is an inefficient, diffuse heat source that creates a large HAZ, leading to considerable distortion, especially on thin sheet metal. The laser’s focused beam prevents this widespread heat damage.
-
Automation: Laser systems are inherently easier to automate, enabling high-volume, repeatable production with less required manual skill than TIG.
Laser Welding vs. MIG Welding
Metal Inert Gas (MIG) welding is a versatile, high-deposition process, but it lacks the precision of a laser.
-
Precision & Quality: Laser welding is a non-contact process that produces clean, spatter-free welds. MIG welding is prone to spatter that requires post-weld cleanup.
-
Gap Tolerance: MIG welding is more forgiving of poor joint fit-up because its consumable wire acts as a filler. Laser welding demands precise alignment and tight tolerances.
-
Material Thickness: While high-power lasers can handle thick sections, MIG is often more practical for very heavy plate. Laser welding excels on thin to moderate material thicknesses where distortion control is critical.
At-a-Glance Comparison Table
| Feature | Laser Beam Welding | TIG Welding | MIG Welding |
| Welding Speed | Very High (4-10x TIG)
|
Very Low | High |
| Heat-Affected Zone (HAZ) | Minimal / Very Narrow | Wide | Wide |
| Thermal Distortion | Negligible | High | Moderate to High |
| Gap Tolerance | Very Low (<0.1 mm) | High | Moderate |
| Weld Profile | Narrow & Deep | Wide & Shallow | Wide & Variable |
| Initial Equipment Cost | Very High | Low
|
Low to Moderate
|
| Best For | Precision, speed, automation, thin materials
|
High-quality manual work, aesthetics
|
General fabrication, thick materials |
The Science Behind the Weld: Core Principles Explained
Understanding how the laser interacts with stainless steel is key to mastering the process. It primarily operates in two distinct modes determined by power density.
Conduction Mode vs. Keyhole Mode
-
Conduction Welding: At lower power densities, the laser heats the material’s surface, and the heat “conducts” into the part. This creates a shallow, wide, and aesthetically smooth weld, ideal for thin materials (under 1-2 mm) or visible seams where appearance is critical.
-
Keyhole (Deep Penetration) Welding: At higher power densities (around 1.5 MW/cm²), the laser instantly vaporizes the metal, creating a deep, narrow cavity called a “keyhole.” This keyhole traps the laser’s energy, channeling it deep into the material for strong, full-penetration welds in thicker sections.
Continuous Wave (CW) vs. Pulsed Lasers
-
Continuous Wave (CW): The laser delivers a constant, uninterrupted beam of energy. This mode is perfect for creating long, continuous seams at high speeds in automated production.
-
Pulsed Laser: The laser delivers energy in short, powerful bursts. This approach provides precise control over heat input, minimizing the HAZ and making it ideal for welding delicate, heat-sensitive components or creating overlapping spot welds for a perfect seal.
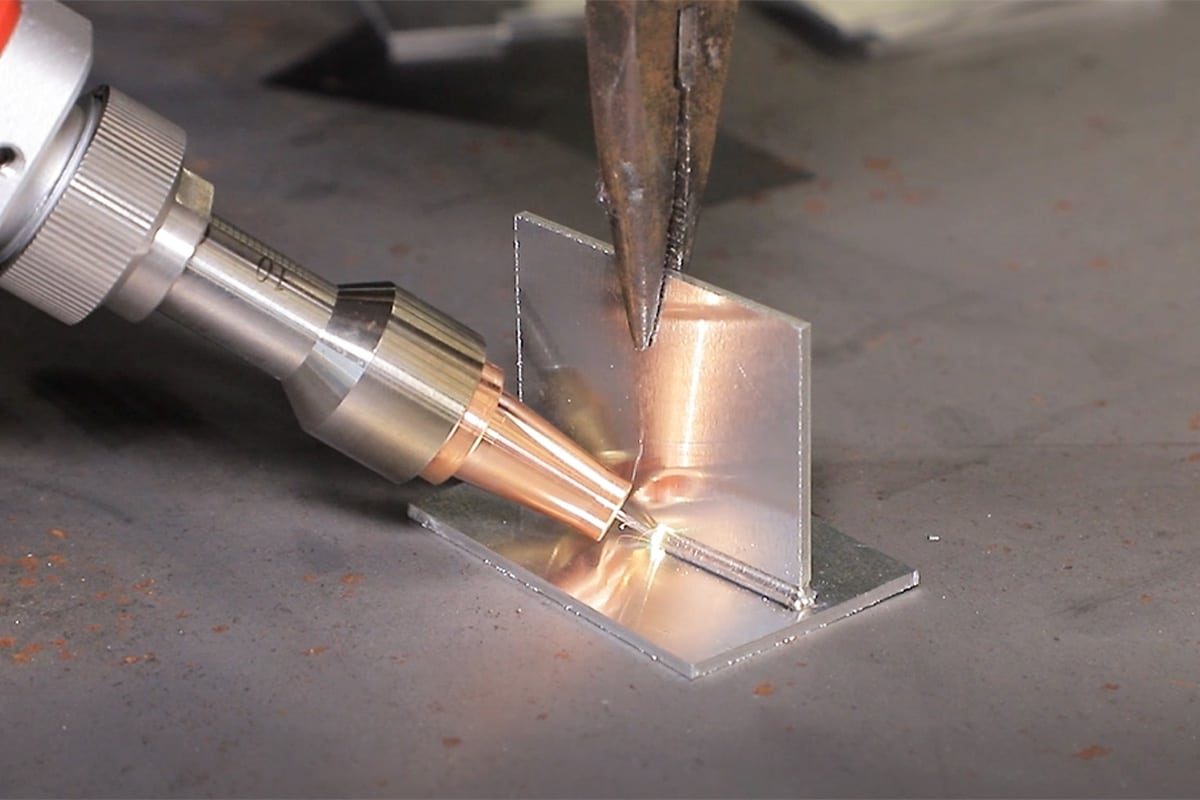
A Step-by-Step Guide to Flawless Preparation
In laser welding, success is determined before the beam is ever activated. The process’s precision demands meticulous preparation.
Step 1: Joint Design and Fit-Up
Unlike arc welding, laser welding has very low tolerance for gaps or misalignment.
-
Joint Types: Butt joints are the most efficient but require a near-zero gap (typically less than 0.1 mm for thin sections). Lap joints are more forgiving of fit-up variations.
-
Gap Control: An excessive gap will prevent the small molten pool from bridging the joint, leading to incomplete fusion and a weak weld. Use high-precision cutting methods and robust clamping to ensure perfect alignment.
Step 2: Surface Cleaning and Contaminant Removal
The laser’s intense energy will vaporize any surface contaminants, trapping them in the weld and causing defects like porosity.
-
Cleanliness is Critical: The surface must be completely free of oils, grease, dust, and adhesive residues.
-
Cleaning Method: Wipe the joint area with a lint-free cloth soaked in a volatile solvent like acetone or 99% isopropyl alcohol immediately before welding.
Mastering the Machine: Optimizing Key Welding Parameters
Achieving a perfect weld requires balancing several interconnected variables.
The Parameter Triad: Power, Speed, and Focal Position
These three settings collectively determine the energy input and weld profile.
-
Laser Power (W): Higher power enables deeper penetration and faster speeds. However, excessive power can cause burn-through on thin materials.
-
Welding Speed (mm/s): Faster speeds reduce heat input and distortion. If the speed is too high for the power level, it can result in incomplete penetration.
-
Focal Position: This adjusts the laser’s spot size and power density. A focus on the surface creates the deepest, narrowest weld. A focus above the surface (positive defocus) creates a wider, shallower cosmetic weld. A focus below the surface (negative defocus) can enhance penetration in thick materials.
Shielding Gas Selection: Argon vs. Nitrogen
Shielding gas protects the molten weld pool from atmospheric contamination and stabilizes the process.
-
Argon (Ar): The most common choice, providing excellent protection and producing stable, clean welds.
-
Nitrogen (N2): Often preferred for stainless steel, as it can enhance the final joint’s corrosion resistance.
-
Flow Rate: The flow rate must be optimized. Too little will fail to protect the weld, while too much can create turbulence and draw in contaminants. A flow rate of 10 to 25 liters per minute (L/min) is a typical starting range.
Parameter Starting Points: A Reference Table
The following are general starting points for welding 304/316 austenitic stainless steel. Always conduct tests on scrap material to fine-tune for your specific application.
| Material Thickness (mm) | Laser Power (W) | Welding Speed (mm/s) | Focus Position | Shielding Gas |
| 0.5 | 350 – 500 | 80 – 150 | On surface | Argon or Nitrogen |
| 1.0 | 500 – 800 | 50 – 100 | On surface | Argon or Nitrogen |
| 2.0 | 800 – 1500 | 25 – 60 | Slightly below surface | Argon or Nitrogen |
| 3.0 | 1500 – 2000 | 20 – 50 | Below surface | Argon or Nitrogen |
| 5.0 | 2000 – 3000 | 15 – 35 | Below surface | Argon or Nitrogen |
Quality Control: A Troubleshooting Guide to Common Defects

Even with a precise process, defects can occur. Understanding their cause is the key to prevention.
Identifying Common Laser Welding Defects
-
Porosity: Small gas bubbles trapped in the weld, often caused by surface contamination or improper shielding gas flow.
-
Hot Cracking: Centerline cracks that form as the weld solidifies, sometimes due to material composition or high thermal stress.
-
Incomplete Penetration: The weld fails to fuse through the entire joint depth, usually from insufficient power or excessive speed.
-
Undercut: A groove melted into the base metal at the edge of the weld, often caused by excessive speed or a large gap.
-
Spatter: Molten droplets ejected from the weld pool, typically from excessive power density or surface contamination.
Troubleshooting Chart: Causes and Solutions
| Defect | Probable Causes | Recommended Corrective Actions |
| Porosity | Surface contamination; improper shielding gas flow. | Implement rigorous pre-weld cleaning; verify correct gas and optimize flow rate. |
| Hot Cracking | Susceptible material; high thermal stress. | Use appropriate filler wire; preheat the material to reduce thermal shock. |
| Incomplete Penetration | Insufficient power; excessive speed; poor focus. | Increase laser power or decrease welding speed; verify and adjust focal position. |
| Undercut | Excessive speed; large joint gap. | Reduce welding speed; improve part fit-up to minimize the gap. |
| Spatter | Excessive power density; surface contamination. | Reduce laser power or use a positive defocus; ensure surfaces are meticulously clean. |
The Final Steps: Post-Weld Cleaning and Passivation
The welding process damages the very properties that make stainless steel “stainless.” Restoring them is a mandatory final step.
Why You Can’t Skip Post-Weld Treatment
The heat from welding destroys the invisible, protective chromium-oxide layer on the steel’s surface. This leaves the weld and the surrounding HAZ vulnerable to rust and corrosion.
Passivation Methods Explained
Passivation is a chemical treatment that removes surface contaminants and helps reform a robust, uniform chromium-oxide layer.
-
Chemical Pickling: A traditional method using hazardous acids like nitric and hydrofluoric acid to clean and passivate the surface.
-
Electrochemical Cleaning: A modern, safer, and faster method that uses a mild electrolytic fluid and a low-voltage current to clean and passivate the weld in a single step.
Safety First: Critical Precautions for Laser Welding
The high-energy nature of laser welding introduces serious occupational hazards that require strict safety protocols.
The Hidden Danger: Hexavalent Chromium (Cr(VI)) Fumes
When stainless steel is heated to welding temperatures, the chromium in the alloy can form hexavalent chromium (Cr(VI)), which becomes airborne in the fume.
-
Health Risks: Cr(VI) is a known human carcinogen linked to an increased risk of lung cancer. It can also cause severe respiratory, skin, and eye irritation.
-
Exposure Limits: OSHA sets a strict Permissible Exposure Limit (PEL) of 5 micrograms per cubic meter of air (5 µg/m³) for Cr(VI).
Essential Safety Measures
-
Engineering Controls: The most effective way to protect workers is to capture the hazard at its source. A high-efficiency fume extraction system with a multi-stage HEPA filter is essential to capture the ultrafine particles generated by laser welding.
-
Personal Protective Equipment (PPE): All personnel in the area must wear laser safety glasses rated for the specific wavelength of the laser. If fume extraction cannot reduce exposure below the PEL, approved respirators are required. The welding operation must also be conducted within a light-proof enclosure with safety interlocks to prevent accidental beam exposure.
Frequently Asked Questions (FAQ)
What is the best type of laser for welding stainless steel?
Fiber lasers are generally the best choice due to their shorter wavelength, which is more readily absorbed by stainless steel, and their excellent beam quality for precise control.
Can you laser weld different thicknesses of stainless steel together?
Yes, laser welding is highly effective at joining dissimilar thicknesses with minimal distortion and no burn-through on the thinner part, a task that is very difficult with TIG welding.
Is filler wire necessary for laser welding stainless steel?
Often, no. Laser welding can produce strong, full-penetration welds without filler material (autogenously), which simplifies the process. Filler wire is used when the joint design has a larger gap or when specific metallurgical properties are required.
What is the maximum thickness of stainless steel that can be laser welded?
With high-power systems, it’s possible to weld stainless steel up to 1/4″ (6mm) or even thicker in a single pass. Hybrid laser-arc processes can weld sections over one inch thick.
Conclusion
Laser welding’s advantages in speed, precision, and quality make it the superior choice for modern stainless steel fabrication. It produces stronger, cleaner joints with negligible distortion, preserving the material’s integrity and appearance.
However, achieving these world-class results depends on a holistic approach. Success is the culmination of a high-precision manufacturing chain—from meticulous joint preparation and systematic parameter control to mandatory post-weld passivation and an unwavering commitment to safety. By mastering this process, you can unlock a new level of efficiency and quality in your operations.
Post time: Oct-08-2025